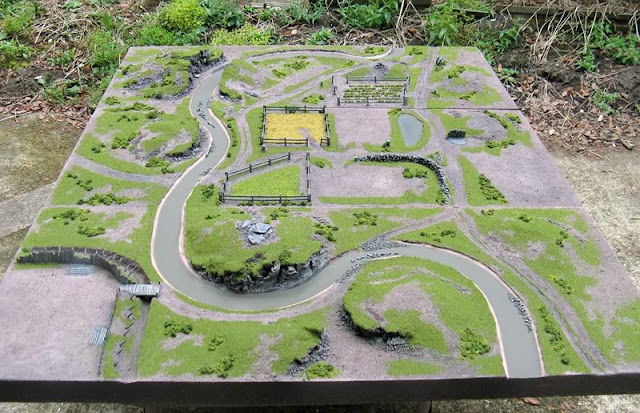
Nevertheless, it was to the internet that I turned once again to help me de-flatten my terrain boards. In particular I referenced three fabulous projects, two of them by the same person:
1 - Captain Blood's French & Indian War board
Anyone who has even accidentally stumbled across the Lead Adventure Forum will be aware of this hobby giant. Not only does he imbue, among others, his War of the Roses miniatures with an almost luminous quality of colour (they've appeared in at least one print magazine as well), but he also produces fabulous and realistic terrain boards.
2 - Captain Blood's Beyond the Donga project
Yes, it's him again. This time with a setting for cavemen of the Hollywood variety to explore the caves beyond their valley. This one had some particularly useful tips on foliage which I'll be returning to at that stage.
The full project log, complete with much well-deserved gushing from other LAFers is here: LAF link
3 - 1000 Foot General's terrain boards
When I found this project, I whooped aloud! In addition to the eye-candy of Cpt. Blood's projects, this gave a step-by-step approach, including designing re-arrangeable boards, which exactly fitted my hopes and intentions. You will see that I copied the board designs with shameless enthusiasm! I've also discovered the same thing about hills - they go on a long way across the board if they're going to look "proper".
Looks familiar, right?!
This is his at the pre-flocking stage. Lovely earth tones...
And then his finished product, sans water effects:
If I can get close to any of those as my finished project, I will be a very happy man. But that's the aim...
So far, I'm at the stage below, waiting for plaster to dry before I can continue. Next step will be to face the cliff with cork bark (I have a bag ready) and then finish smoothing off the slope down from the hill side.
I shall add a final coat of watered-down plaster (Greek yoghurt consistency, or slightly thinner) to smooth out my hamfisted use of a palette knife. Seriously, my respect for plasterers has increased doing this!
I hope your projects are continuing successfully,
Rab


I've finally opted for printed mats because of a shortage of space but damn those tables look great !
ReplyDeleteIf I hadn't bagged the cellar as a gaming area, I'd have done exactly the same as you. I nearly did anyway, but those projects of Cpt. Blood worked their siren call on my delusions of grandeur!
DeleteEnough to get one eyeing up pink foam insulation boards at B&Q with a little more than idle curiosity!
ReplyDeleteDo it! I actually got mine through our school's technology suppliers where it worked out quite a bit cheaper, almost exactly 20% in fact ;)
DeleteHaving just moved house and lost my old nerd cave, I'll have to wait until we've finished chatting to architects about the possibility of getting our loft converted. Until I've got a dedicated space I'll have to bide my time. I've already taken over the dining table for painting and have littered the living room with boxes of unpainted minis so I'm sure the wife's patience will only be stretched so far...
DeleteI'd love to build a permanent wargaming board, but space & an undefined time frame of living in my current abode, makes building one a silly idea. But by Jesus, yours looks awesome!!!!
ReplyDeleteWell done :)
Cheers, fella - I hope you're looking at mine rather than the finished projects with that praise! I'll get there, though. It's taken about ten years of planning and settling in a real grown up house with a mortgage and everything to get to this point - don't abandon hope yet!
DeleteVery inspiring work! I'm recently come into a massive pile of Blue Foam cut offs and fragments so I'm always looking for interesting things to do with them. Other than the Hot Wire tool what have you found to be most effective for shaping/cutting the foam?
ReplyDeleteThanks, Blue :)
DeleteI have to say that the hot wire is the undisputed champion for cutting foam. In distant second place I found a (very sharp!) scalpel or one of those snappable craft knives is ok, particularly for thin sheets. Blue foam sands really nicely, so a variety of sandpapers would be helpful. I'm borrowing a carpenters rasp (looks like a cheesegrater on a stick!) later this week and will trial that.
I did see online that an electric kitchen knife is pretty effective.
You've got the terrain bug too! I've just started making a scenic board that will incorporate a toy castle for my son's birthday (I see it as a joint gift!). I used much of the same inspiration as you.
ReplyDeleteI certainly have, Stuart! Funnily enough, I also have a toy castle that will (one day!) get incorporated...
Delete